What I'm up to
  • Oxo Good Grips Small Wooden Spoon
    Oxo Good Grips Small Wooden Spoon
    OXO

    everyone needs these, many of them.

  • Mauviel Cuprinox Style 8-inch Round Frying Pan
    Mauviel Cuprinox Style 8-inch Round Frying Pan
    Mauviel

    Scarily, I can say I have enough copper. Not many people can utter those words.

  • Le Creuset Enameled Cast-Iron 5-1/2-Quart Round French Oven, Red
    Le Creuset Enameled Cast-Iron 5-1/2-Quart Round French Oven, Red
    Le Creuset

    The same thing could be said for Le Creuset, but still. Great for braising and soup making.

  • The Essential New York Times Cookbook: Classic Recipes for a New Century
    The Essential New York Times Cookbook: Classic Recipes for a New Century
    by Amanda Hesser
  • Nordic Ware Bakers Half Sheet, 13 X 18 X 1
    Nordic Ware Bakers Half Sheet, 13 X 18 X 1
    Nordic Ware

    What did I do before I started using this half sheet? Cry.

flora and flying. Get yours at bighugelabs.com

Entries in recipe (3)

Wednesday
Nov032010

Cauliflower - the brains of the vegetable world

cauli


Growing up, one of our dorky family traditions was to boil up a cauliflower on Saturday afternoon and eat it.  Yes, you read correctly, boil the hell out of a head of cauliflower and eat it with some salt, pepper and
lemon juice. If we were daring, we might venture to the sublimeness of boiled turnips. We lived
large back then - cauliflower, the Rockford Files and a nap. Saturdays were great nap days.

The smell of boiled cauliflower leads most to wrinkle their noses up and stare at the dog. It is not
a pleasant smell and it is a smell that lingers. Cauliflower is much maligned - its the last
vegetable left on the veggie tray, the vegetable that looks much like your brain on cauliflower,  the vegetable that turns grey with over cooking, over smothered with orange cheese sauce and the vegetable most likely to be fed to the aforementioned dog.

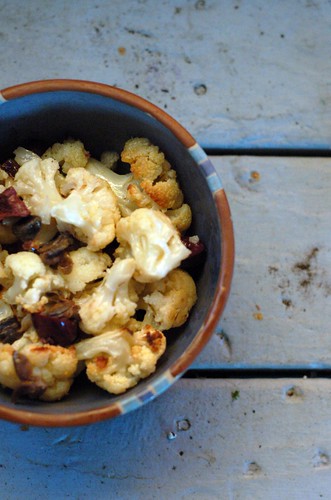
It is a vegetable that shines with tossed with olive oil and roasted. It becomes a whole other
creature -- sweetened, caramelized and savory at the same time. Tonight I was honored to be invited
to a small gathering to honor Amanda Hesser. The guests were asked to cook things out of her various
cookbooks and other New York Times cookbooks. I couldn't locate our NYT International Cookbook, so I
borrowed the The New York Times Country Weekend Cookbook from the library to see what I could find.

Hesser's take on Mario Batali's Roasted Cauliflower had me hooked. It hit the key points necessary
for potluck friendly food - easy to prepare, easy to double, best served at room temperature and
keeps for a day in the fridge and in fact tastes better with a little sitting around.  The recipe is really entitled - Roasted Cauliflower with lemon, olives and capers is a amazing mix of flavors. The sweetness and caramel flavors of the cauliflower, mixed in the tart lemon juice and lemon rind, a touch of garlic (just a touch, not overwrought) and the saltiness of
the capers and meatiness of the olives.

Its a keeper. 

The original recipe calls for a lot of olive oil. I was aghast at the amount. You need to use the oil
in three steps, cauliflower roasting, marinating and olive and caper desalting. You can limit the
amount of oil for the marinating, and discard the oil from the desalting. It all works out in the
end.

The recipe also calls for salted cured capers, these are an extravagance, but well worth it. They are
typically larger than the average brined caper and work beautifully paired with the olives.

Mario Batali's Roasted Cauliflower with lemon, capers and olives - From the New York Times Country Weekend Cookbook (2007).

Makes six generous side servings or 12 as nosheri
Time to make recipe ca. 1 hour, not all active time


Ingredients:

2 medium head of cauliflower cut into florets
salt and pepper
Approximately 2 cups good extra virgin olive oil to be divided and used for three different stages of the recipe
3 cloves garlic, peeled with green germ removed (halve the garlic)
2 T fresh thyme leaves, I used 1 T dried
Grated zest of 2 lemons, reserve lemon juice for end of recipe
3 T salt cured capers, rinsed and dried
1/3 cup kalamata olives, chopped

Heat oven to 375. Measure and cut a piece of parchment paper to fit in a jelly roll pan or large baking sheet.  Place washed cauliflower florets in bowl, add salt and pepper and toss to distribute evenly.  Pour 1/3 cup olive oil in bowl and and gently toss to coat the florets. Spread cauliflower on jelly roll pan. 

Roast in oven until cauliflower starts to brown and gets soft. You will want to check every 10
minutes and rotate the tray every ten minutes. The roasting should take approximately 30 minutes.
When completed, remove tray from oven and let cauliflower cool.

While the cauliflower is roasting, combine 1 cup of olive oil, garlic,  the lemon zest and thyme in a heavy,
but small pan. Place pan on burner to heat, but not boil You should have the oil bubbling gently. I
used a small copper sauce pan and had to keep my burner on a low heat. Check after about 20 minutes
to see if garlic is softened. When softened, remove from heat and let cool. When the oil has cooled
to room temperature, either use a blender or immersion blender to puree garlic into the oil.

In a separate pan, add the remaining oil, capers and olives together and warm for five minutes. Note:
My second making of this recipe - I rinsed the capers, but then just added them to a little oil to
help plump them up. I didn't heat them and they tasted just fine. I skipped adding the olives to the
oil as well. Once capers have plumped, drain oil.

Place cauliflower in a big bowl (you need to toss the mixture), add 1/3 cup of lemon/garlic oil and
toss to coat. You can add a little more of the oil mixtureif you want, but you don't want it dripping
with oil. Reserve the rest of the oil for another use. Add capers and chopped olives, season with
lemon juice and add salt and pepper if you think it might need a little more. The olives and capers
add a lot of salt, but not necessarily onto the cauliflower.

The dish is great at room temperature, but refrigerate if not using soon. Bring up to room temp before serving.


Wednesday
Apr212010

Pie Plant gets a make over - khoreshte rivas

When I think of rhubarb, I think of spring, red, tart and pie and cobbler. Most of the recipes you find for rhubarb are for lovely sweet things – desserts mostly, with a few jams and chutneys thrown in for variety. Rhubarb is the first thing to emerge from the garden’s long winter’s sleep. I like to use new rhubarb as much as possible for two reasons – the more you pick rhubarb, the more it produces (with a little compost dressing on the side) and that early rhubarb is tenderer than mid season tougher stalks.

Last year I was talking to my mom about rhubarb and she mentioned that she grew up eating a rhubarb stew. Rhubarb in a savory stew was something I had never heard of. Doing some research, I see that there are lots of variations of the savory rhubarb stew from the Middle East region, some are very simple – meat and onions – stewed with rhubarb added at the last minute. My mom’s version is a bit more complex. Most Persian stews rest on a base of seasoned meat that you can adapt to your pickier eaters. Once that stew base is created, you can add variations of herbs, vegetables and legumes to create several different tasty stews.

The stew base requires a bit of time – you can’t start a khoreshte at 5 pm and expect it on the table at 6 pm. I remember coming home from school to a house filled with the smell of stewing beef and realizing that dinner that night would be a khoreshte.  If you are a more organized person than myself, you can make the stew base ahead of the time, freeze it and take it out to thaw in the morning and then add the other ingredients and let it simmer until ready to serve.

Like most stews, this will taste better the next day, but don't over cook the rhubarb - you want to see the pieces not a mush.


Basic Khoreshte base (iteration number one)
Serves 6 Americans or 3 Iranians

1.5 lbs of stewing meat – chuck or top sirloin, trimmed of most of the fat and cut into 1” cubes
2 onions - sliced
2 T butter
4 c water
5 T olive oil
2 T tomato paste
Salt and pepper to season
1 t turmeric

The rhubarb part

4 cups rhubarb, cut into 1" sections. If rhubarb is big - slice stalks in half and then cut into 1" sections.
1/2 cup fresh mint chopped
1 cup fresh parsely chopped
1 T lemon juice
Salt to taste

Heat butter and  2 T olive oil to frying pan at medium heat. Add meat and begin browning the cubes turning to make sure all sides have been sealed , this should take about 7 to 10 minutes. Make sure you don't crowd the meat in the pan. Remove from heat and set aside. In the remaining olive oil, saute the onions on medium heat  until soft. Remove from heat. In a heavy pot - I use a le creuset small dutch oven, place seared beef and onions. Cover with water. Add tomato paste and tumeric and cook for one hour on low heat until meat is cooked and the flavors have blended. Season with salt and pepper. There should be about 1.5 cups of stewing juices remaining in the pot. Turn off pot for now.

In a medium sized saute pan, heat the remaining 1 T of olive oil.  Add mint and parsely and saute for five minutes, until crisped, but not browned. 

Turn stew pot on to low heat, add mint and parsely and stir until blended. Let simmer for ten minutes to marry flavors. Add rhubarb and let cook for another ten to fifteen minutes, until rhubarb is tender,but doesn't fall apart.

Remove from heat, stir in lemon juice. Season with a little more salt and pepper.

Serve with over hot polo - steamed rice. 


Friday
Apr092010

Biscotti for a good cause

My mom likes to take recipes and tweak them. I don't know how she started making biscotti. Maybe it was when they became popular in the early 1990s. I remember her buying them once in a while as a treat for us from Delaurenti's. I think it was when TH bought her the Williams Sonoma Cookies and Biscotti book for Christmas is when she really started playing with the basic recipes.

My biscotti recipes come from a tattered photocopy from an early 90's issue of Gourmet and Great Good Food - the low fat Silver Palate cookbook. While they have the crunch of a good biscotti, they lacked the mouth feel of a rich biscotti. This is probably due to the lack of butter in any of these recipes. They are all good, but they are from a time in my life where egg whites ruled.


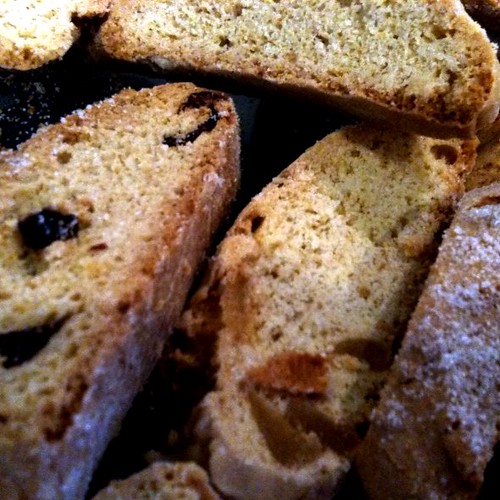
My mom took a standard almond biscotti recipe and created at least six different varieties of biscotti flavors without involving too much chocolate. Over the next few days I will be sharing them with you.

If you wish to sample them yourself, they will be available for sale this Saturday, April 17th at the Uptown Metropolitan market as part of the National Food Bloggers Bake Sale. The Bake Sale benefits Share our Strength.  There are lots of awesome bloggers that will be showing off their stuff - come on by and pick up Saturday night dessert or Sunday morning muffins. I tell you, based on the list I have seen, it is going to be great!

Banamak.org will be featuring five to six different flavors of mom's biscotti for you to sample.

Biscotti are pretty easy to make - they hold forever and can be tarted up with nuts, spices and chocolate. Their name comes from the fact they are bis (twice) cotto (baked/cooked).  The second baking is the most important - that is when the moisture is drawn out of the biscotti and it gets its crunchy goodness. I recognize there are two camps - those who like them soft, and those who like them hard. Put me in the hard biscotti camp.

Mom's master recipe - makes 36-48 depending on how you slice them.

1 cup granulated sugar

2 cup all purpose unbleached flour

2 eggs (large)

1 stick (1/2 cup) unsalted butter at room temperature

1 t vanilla

1/2 t baking soda

1/2 t baking powder

1/4 t salt

1 T lemon zest

1 T orange zest

1 cup unsalted pistachio meat (the greener the better)

Working directions:

Preheat oven to 350 F.

In one bowl, mix together flour, baking soda, baking powder, salt, and pistachio meats.

In your mixer, cream butter, add sugar, vanilla, zests together.  Add eggs one at a time to the wet ingredients until combined.

Add dry ingredients to wet ingredients, and mix until well blended, but do not over blend. Mixture may be sticky - add a little more flour if it is unworkable.

Take the dough and place on a well floured cookie sheet. Knead a few times.  Divide dough into three parts and form into logs.  You may still have flour on your log - this is good.

Place logs onto a parchment lined baking sheet and Flatten the  logs - about 12" long and 4 inches wide.

Bake at 350 degrees F for 20 minutes.  The biscotti will be a bit spongy, dry to the touch, but not too dry.  Turn off the oven.


Remove from oven and let biscotti cool.  When cool enough to cut - cut the logs on a diagonal - with the nuts its imperative your knife is sharp and your knife skills good enough that you can cut through the biscotti and not have them crumble on the nuts.  Put newly cut biscotti on cookie sheets.

Preheat oven again to 350, place biscotti back into oven and turn oven off. Let biscotti dry for 2-3 hours in the cooling oven.  If you are doing this in the evening, you can leave them in the oven over night.

When the drying process is over - store in an airtight container. Biscotti should last up to a month, if they last that long.

Coming next - some more variations.